This guest post for The Abundant Host is courtesy of Veronica over at Host Hacks Australia, a fellow lady in the business of Airbnb (and an amazing interior designer).
I asked Veronica: What does being an “Abundant Host” mean to you?
She told us: Abundance is the cornerstone of hospitality, and we have the opportunity to articulate that very effectively as Hosts, no matter what our means. It’s not about luxury or wealth—and even those on the most modest incomes can afford it. Generosity of spirit costs nothing. I believe that generosity and the joy of sharing is at the heart of hosting philosophy—and also just a nice way to live a good life! It’s all about reciprocity for me, and if you share your abundance, you will reap the rewards.
Do you see why I love her? :)
My hope is that this piece inspires you to renovate parts of your Airbnb listing using inexpensive, DIY tactics—and have a genuinely good time doing it.
Enjoy!
—Amy, The Abundant Host
—
When I have more than two days off, I start to look around for things to renovate or spray-paint. This time, the balcony was in my line of sight and I decided I was sick of it after 4 years, so a design make-over was called for.
I invited my Airbnb hosting buddies to watch my progress on my Facebook posts as I went on my journey of discovery; now that I’ve finished, here is the Big Reveal with a buying guide to boot!
Here we go…
What’s wrong with your poor inoffensive balcony, I hear you say? Well, all first-world problems really. As the only “outdoor” area in my Williamstown town-house, I want to be able to relax out there, and of course it had to double as an awesome party space.
Here are the things that bothered me about my balcony:
- It faces north, so gets blazingly hot on sunny Australian days. In high summer, it is unbearable out there. Although the area is partly roofed, the sun still manages to belt in between the rafters of the pergola
- The tiled floor gets too hot for bare feet. The tiles always look dirty
- Hot northerly winds ensure that most hapless plant-life is doomed to fry in record time
- Although the space is a good size at 4 x 4.5m, it is dominated by a huge outdoor dining setting. It’s a great big cube, cleverly designed so that the seats recess underneath. It seats 8 and that has been great, but there’s not much room for anything else. We certainly do spend lots of time eating out there in summer so I need some dining setting solution. The space is also home to a monster BBQ which is plumbed into the gas, so moving it is not an option.
- The covers that I had so lovingly made for the furniture have now faded in the sun and are looking very unattractive.
- The balcony needs to be neglect-proofed in case I am travelling… Any live plants out there will fry in the hot sun, especially if they don’t get water for a couple of days. I often have Airbnb guests in the house while I’m away but I don’t want to put that responsibility on them. They should be able to enjoy the space without working to maintain it, and so should I!
- There’s nowhere to lounge… If you want to sit outside you have to sit bolt upright in one of the setting’s chairs. Now I don’t know about you, but my idea of relaxing is to be in a sarong, reading a book in a reclining position, preferably with a glass of something crisp & white accompanying. Ultimately, a Nubian slave feeding me grapes, but I’ve heard that slavery is frowned upon these days… :)
In summary, I wanted to transform my balcony into an outdoor extension to my living area: somewhere that is spacious enough for entertaining and lounging, yet still has some kind of dining possibilities. Naturally, it has to look stunning! It also needs to be low-maintenance and drought-proof to survive.
Let’s take a look at the “Before”:
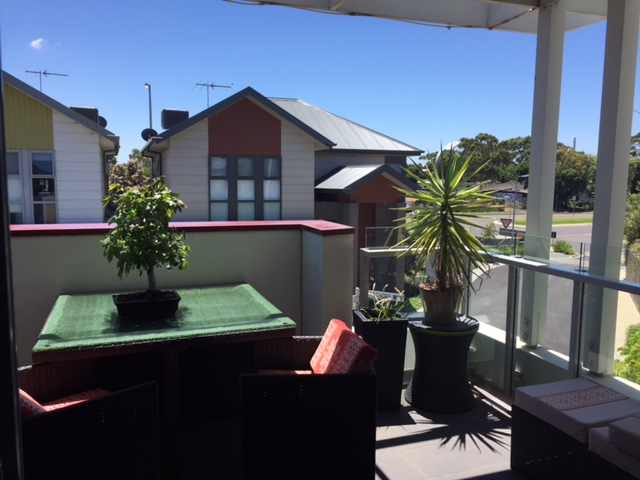
Note specifically:
- Large scale balcony dining furniture dominates the space
- Tiles are scorching-hot underfoot and always look dirty
- Red & white soft furnishings have faded in the sun
- Area gets blazingly hot in the summer sun
- Not enough greenery
Let’s get to fixing it up!
First up, sell that out-sized dining setting. I put it up on my local Buy Swap Sell Facebook page, and sold it within 24 hours for $200! Quicker and easier than selling it on Craigslist or Ebay. Tip: Check Facebook to see if there is a Buy Swap Sell group in your neighborhood.
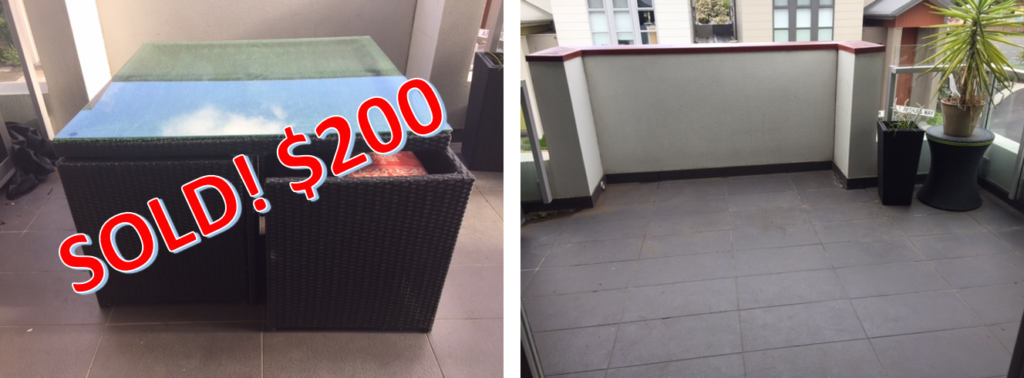
Wow, there’s room for a pony now that the old setting is gone!
I’m floored…
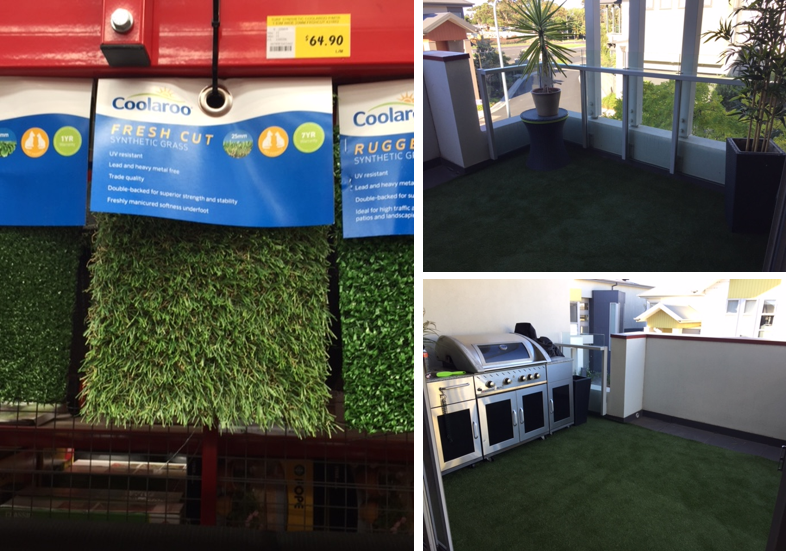
I’ve decided that a nice bit of astro-turf is the way to go. I’ve used this before on balconies in my Airbnb properties. You can just drop it down with no installation required. It has drainage holes so any moisture can still run through to the drainage pits on the balcony floor. It is soft and cool underfoot, and if you close your eyes you can imagine that it is the real thing. It is one of the cheapest flooring solutions you can go for—and it looks great.
There are lots of different options available—some look super realistic and some are very obviously not, which can also be ok in the right situation (for a fun retro look, you could team some of the obviously fake stuff with some Acapulco chairs and ornamental flamingoes!).
The depth of the pile varies from about 12mm to a lush 40mm. For a balcony, around 25mm is fine, which is what I opted for. The fibers themselves also come in a variety of shades: The most realistic turf has the green grass filaments combined with curly brown undergrowth, which is what real lawn usually looks like. There is also green curly undergrowth which looks super luxurious but not quite so true to life (looks nothing like any lawn I’ve ever been in charge of!)
Then there’s the matter of width: this stuff comes in a roll like carpet. I needed to cover 4 meters x 4.5 meters.
I found this glorious 25mm turf at a bargain price for $17 per m2 on GumTree (note: the Australian version of Craigslist in the U.S.). To make matters even better, it came in a 4 meter width so I didn’t have to have a join down the middle! Sold!
I rushed down to a warehouse only 15 minutes from my place. I wanted to have a look and run my fingers through it—it’s not one of those products you can confidently buy online sight unseen to my mind. Half an hour later, they had it delivered to my door and even humped it up the stairs for me. All I had to do was roll it out and run barefoot through its lushness. The turf cost me $200, so I basically swapped it for the old outdoor furniture I had sold.
I was mightily pleased.
Sitting Pretty
Along with my Prettie Turf, I needed something pretty to sit on. The Boxing Day sales were still raging in Melbourne so I researched outdoor furniture showrooms and found Outdoor Living Direct in Hoppers Crossing. My challenge was to find a suite that did not have too big a footprint and would fit into the alcove of the balcony. There’s a lot around, and much of it is very bulky—not balcony-scale at all.
I finally found The One which fit like a glove into that space. It came with 2 ottomans which can be positioned with the sofa to make a chaise, comfy, light and easy to shift around. The price had been slashed so I got a real bargain, and it was delivered 3 days later.
Only one problem… boring color.

But, I had a cunning plan!
Unleashing My Creativity
As you will have gathered by now, I am a bit partial to gilding the lily. I like nothing better than settling in for a big crafternoon with my weapons of choice at the ready:
- My trusty sewing-machine
- 4 thread overlocker
- Screamin’ Jay Hawkins on the Sonos
- Optional equipment: a cheeky Pinot Gris for creative inspiration
(Warning: Avoid operating machinery when drinking for inspiration but if you must, make sure it is a white wine because red wine can ruin your craft masterpiece!)
First stop was to pay homage at the altar of Spotlight, the Mecca of crafters all over Australia. I was looking for some nice bright canvas, and from the huge choice of canvases available was delighted to find the Karim range which is both UV tolerant and weatherproof. However it was pretty expensive at nearly $30/m. On the up-side, it was extra wide at 150cm.
I didn’t buy immediately because I needed to do some measuring up and grapple with the vexed question of which color/design to choose: I liked the green options because they looked fresh, clean and resort-ish, but what about the pattern? Plain green, the cute floral, or the timeless honeycomb pattern? I was trapped in the hell of indecision…
In the end I applied the same classic decision-avoidance technique that I use when buying shoes…
When in doubt, buy all of the colors!
When I went back to purchase I found that the canvas had been drastically reduced in price and was now only $17.99/m! It was as if the haberdashery gods had rewarded me for my monumental feat of indecision. This was surely a sign that I was on the right track.
I bought a couple of meters of all 3 options and decided I would ponder the ensuing design challenges over a G&T and a good lie down.
Having gone completely over the top with two different patterns and a plain fabric, I then had to decide how and where to apply them. I like to mix and match, and as I was only dealing with 2 colors, how hard could it be?
It actually turned out to be a piece of cake—you can see how I used the colors in the pics below.
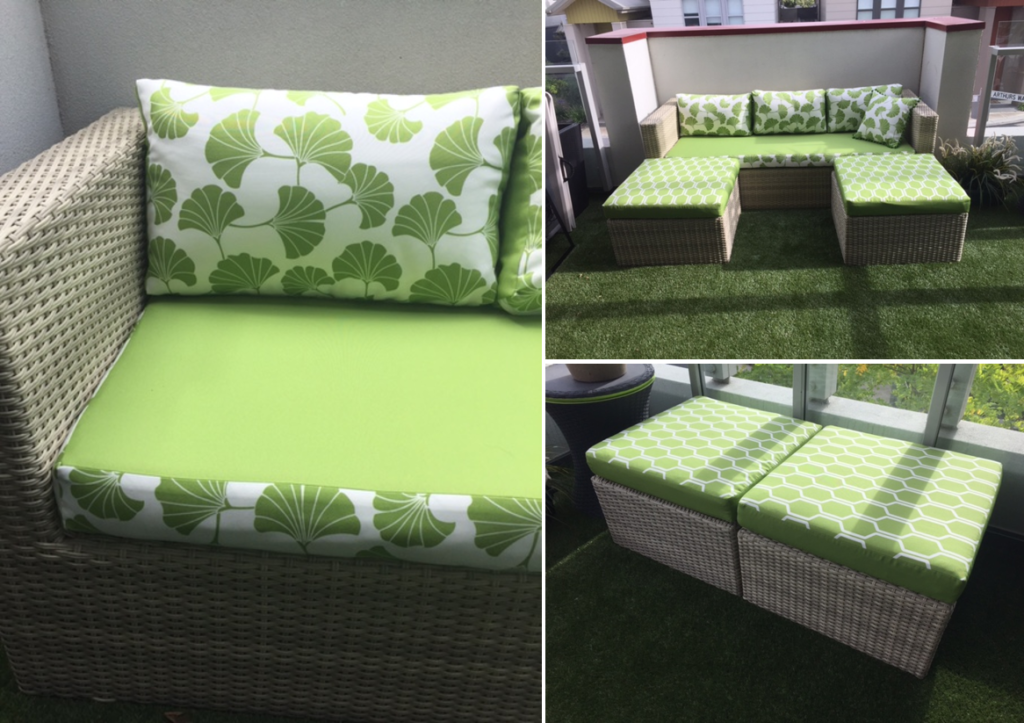
I applied contrasting side panels to all the flat surfaces (floral on the plain bench cushion, plain on the honeycomb ottoman cushions, plain to the sides of the floral backrest cushions). Looks great and avoids the need to match patterns on seams which is just about impossible in this case. I purchased heavy duty white zippers for all covers—you can buy these by the meter, which is really handy because the lengths required are well beyond your standard dress zipper.
With the scraps, I made a cute little cushion with a strip of velvet bobbles around the edge. Kitch but sweet, because I hate wasting fabric. Consequently I have a cushion to match every dress in my wardrobe. When I lie on my bed, I almost disappear.
Blinded By Options
Now comes the most challenging part of my mission, dear reader.
Although I now had a cute-as-a-button couch setting and tootsie-friendly lawn, the sun was still blazing down on all below and made it impossible to enjoy the space between 10 a.m. – 4 p.m. A solution must be found!
The limitations were:
- The Pergola covering the balcony was structurally complex, so fixing any kind of blind would be a problem
- I didn’t want to ruin the architectural integrity of the structure visually
- The alcove housing the couch projected further out than the pergola, covering it so any kind of vertical blind was not going to suit
- The area is a second-floor balcony visible from the street. This would also make installation problematic and cherry-pickers of the expensive mechanical type may be required
After considering countless permutations and contraptions, I realized that the only design that would give me the functionality I needed was a retractable awning—the ones that can extend out horizontally with mechanical elbows underneath.
Decision made, I set about getting quotes. I called one company that had a nice website and gave them the dimensions. I was shocked when the estimate came in at an eye-watering $3,400 + an extra $500 if I wanted it motorized.
So, I called a business that is a household name in this industry. They told me that their awnings were top quality German engineered, which pleased me until they hit me between the eyes with the monumental quote of $9,000 + $700 for motorized! After I regained consciousness, I informed them that (a) I would not require gold plating, and (b) I also would not require the German engineer to fly out to Melbourne business class to install it! I was more than a little kresta-fallen until I once again comforted myself with the Oracle of the Apple Isle’s prophecy:
“The answers you seek are on the GumTree of Life.”
Sure enough, when I turned to the Website of Wonder (Craigslist, to you non-Aussies), there it was. The clouds parted and the angels sang as I beheld Factory Fast’s wondrous range of motorized awnings. And verily, it was good.
These splendiferous marvels came in a range of spans from 3 – 5 meters, and promised the same features as their German engineered cousins (including motorization) at a fraction of the price. The shortest at 3 meters was just over $400 and delivery was promised at 3 – 5 days.
I nearly swooned.
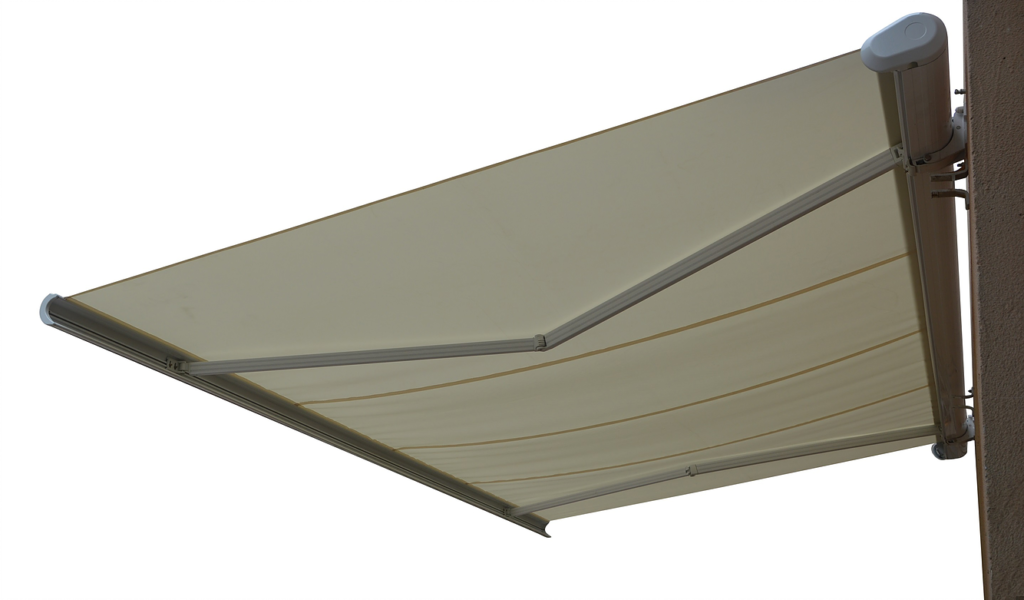
Now I know what you are going to say: “It’s not the same quality.”
While I am well aware that a product from Factory Fast is not going to have the same quality credentials as our German masterpiece of engineering, honestly, it has a one-year warranty and at that price I could replace it every year for the rest of my life expectancy and still be ahead. So, I bit the bullet and ordered the 4-metre jobby in a flush of optimism.
The awning was delivered right on cue, and the instructions promised that even a dim-witted child could install it in under 30 minutes. In the end it took Michael and I two aborted attempts and a modicum of cursing to get the thing up. This was by no means due to any shortcomings in the product or instructions provided, or the skills of the long-suffering brother. It was entirely due to the complexity of the pergola design and the limitations it placed on where we could fix the blind. Once we had it figured out, the brackets went up and the awning slid into them like a dream.
It was a magic moment when I pressed the Button of Glory on the remote control and saw those elbows flex, extending the blind smoothly and silently into the night. I felt vindicated by this paragon of Chinese manufacturing!
(On a technical note, the only thing missing on this product is a wind sensor so I do need to be careful not to leave it extended on windy days lest I wish to see the awning sail over Port Phillip Bay with the pergola fascia attached, reminiscent of Tom Hanks’ raft in Castaway).
The Finishing Touches
There was an ugly rainhead to disguise in the corner, the wall above the BBQ was a bit barren, and the space needed some low-maintenance shrubbery for that lush jungle feel. I have a collection of bonsai that I wanted to display on the parapet wall, but had always held off because the thought of one of them being dislodged by a careless elbow and braining some hapless pedestrian beneath sent a chill down my spine. So I needed a solution for that too.
I had a very nice piece of wrought-iron wall art that had been waiting for a wall to call home, so that was installed over the BBQ and proved to be just the ticket. It is very eye-catching and can be seen from the street.
The rain-head in the corner has been adorned with a spray of artificial mystery plant.
A couple of faux bamboo trees filled the empty corners nicely. Although I prefer the real thing, some well-chosen artificial plants can be a better solution in circumstances limited by harsh conditions and/or lack of time. With my travel schedule, at least I won’t have to worry about watering. I also need to confess that I am a certified Brown Thumb, and responsible for more domestic deforestation than Agent Orange.
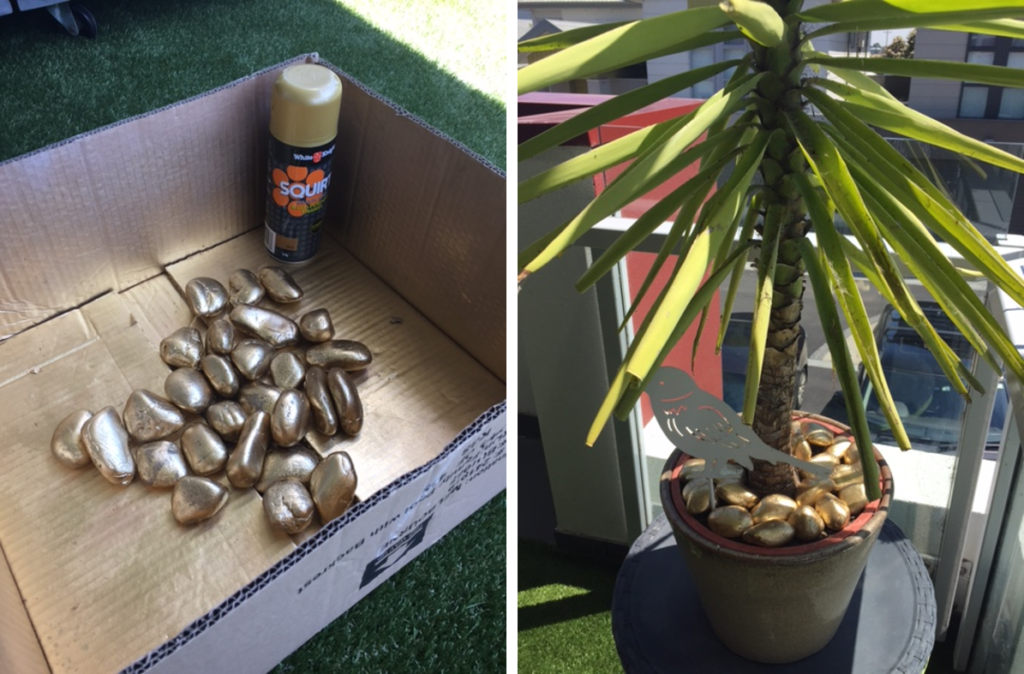
The yukka was looking like it sounds, full of cobwebs and in need of some TLC. I gave its trunk a trim, evicted the arachnids and added a pretty skirt of sprayed gold rocks to the pot. It now looks a million bucks.
I had already decided I would not be cluttering the space up with a coffee table. The frame of the couch is broad enough to hold a glass and I have a little occasional table in the adjoining lounge which I can bring out if needed. I found this nifty bathroom caddy that has a nice small footprint and can hold drinks, snacks and other lounging paraphernalia.
When it comes to dining outdoors which we often do, a simple folding trestle table will be brought into service. It fits neatly into the gap between the BBQ and the balustrade, with seating provided by the couch, the ottomans and some folding chairs if need be. The rest of the time, it will make itself scarce so I can enjoy my spacious balcony.
Now for those killer bonsai… a couple of well-placed brackets under the parapet provide an anchor point to secure them, ensuring that they will fall onto the balcony (not over the wall) in the event of a mishap or strong winds. Humpty Dumpty, look & learn!
Finally, the piece de resistance… my signature Great Balls of Ivy. These little beauties are so easy to make and look fantastic. Being artificial ivy they are perfect for those like me who have a plant-watering disability. To see them swinging in the breeze fills me with delight, and they are a great indicator of adverse wind conditions, early warning of gusts that might imperil my Awning of Joy.
The finished product… voila!

Now, dear reader, my work is done. I am putting my feet up for at least the next week, or until boredom once again moves me into DIY distraction.
Happy Hosting!
Buying Guide (Amazon):
Retractable awnings
Artificial turf
Outdoor furniture
Canvas fabric
Artificial bamboo plants
Hanging baskets
Thanks for reading! Have a question that wasn't answered here? If you'd like more specific help, I'd love to work one-on-one with you. Or, if you want to work collaboratively in a group with fellow motivated hosts, find out if the next Abundant Hosting Mastermind group is open. I also wrote a book, Cleaning Up, where I give you the nuts and bolts (and so much more) of finding your perfect turnover assistant, thereby upleveling your profit and success on Airbnb. Have a beautiful day!
